Hchy
 Platinum Partners
-
Posts
72 -
Joined
-
Last visited
-
Days Won
2
Content Type
Profiles
Forums
Store
Calendar
Posts posted by Hchy
-
-
Welcome to the community! We got a lot of new things coming into the game and hope you enjoy your stay!
-
Welcome welcome! Hope to see you in game and I hope you enjoy all the new content coming out!
-
Adding a Box into the Cache
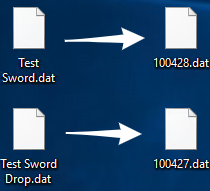
1) First thing you need to do is download your box .dat file for your Model.
2) Once the model is downloaded you need to rename the file into a numeric file. Get with Limes, Willy or Walied to get a range you can use.
3) Add your new .dat Files into the .redemption Folder under custom item data.

Adding a Box into the Client
Now you're going to be taking the Box ID you put in and your box model you added earlier to the cache and adding those together to make the Item appear in the inventory.
Note: Making the box clickable is done on the server side where we will cover later.
1) Open up the Client side of Intellij and Navigate to Client>src>main>java>com>redemption>ItemDef_4
2) the client side of ItemDef_4 is copy and paste Credits to Walied for that! All you have to do is copy the code from an item that's already added into the code to the item you're trying to put in.
3) Once the code is pasted all you have to do is edit the ID, Name, Description, dropModel, and wearModel to put the item in game. Zoom, xoff, yoff ,xan and yan are all how the item looks in the inventory. Some times the pasted code is fine for the inventory I would recommend changing it to how you think it should look. Below this will be what each field changes.
Basic Functions of each field
Zoom - Changes Zoom of item in inventory
xoff - Changes Movement of item Left to right (-30(left) or 30(right))
yoff - Changes Movement of item Up or Down (30(Up) or -30(down))
xan - Changes the up and Down rotation of the item in the inventory (never use negative values)
yan - Changes the circular rotational value (never use negative vaules)4) Now that your Box is coded into the client once you launch the client you will have the box you added however it won't be able to be opened.
Adding a Box into the Server
1) First think we're going to need to do is add the box and ID into server>repository>items>info>info3.conf
2) Next we will need to Add (boxname).java into server>src>main>java>Com>redemptions>server>game>content>boxes
in here you will use the public static final variable to add in rewards and call from the BoxContentsDisplay.java arrays you added in earlier to display the loot.
When Adding a box into game it is important that you import the following
import package com.redemption.server.game.content.boxes
import java.util.ArrayList
import java.util.Listimport com.redemption.server.game.content.season_pass.SeasonPassManager; - This is what distributes season pass points from opening the box
import com.redemption.server.game.item.GameItem; - This is what allow for the item to be added into the game
import com.redemption.server.game.players.Client; - This allows us pull the player getting the item
import com.redemption.server.game.players.PlayerAssistant; - This allows for exp and anything else we add in to be distributed to the player
import com.redemption.server.util.BasicReward; - This allow for us to use Items as BasicRewards in the code allowing for easy copy paste code thanks to walied!
import com.redemption.server.util.Misc; - find out about
You can also import the following for the discord bot to report
import com.redemption.server.discord.DiscordBot;
import com.redemption.server.discord.DiscordChannel;
Add an Array of the contents of your box into BoxContentsDisplay.java located in: server>src>main>java>com>redemption>server>game>content>BoxContentsDisplay.java
Add the box into DonationPanel.Java under server>src>main>java>Com>redemptions>server>game>content>panels>DonationPanel.Java
To make a box open-able you need to add it into ClickItem.Java which is located in sserver>src>main>java>Com>redemptions>server>net>packets>impl>ClickItem.java
If (itemID == Yourbox.BOX_ID) {
Yourbox.open(c);
return;
} -
-
- Step One - Download and Modify Your .dat file
-
1) First thing you need to do is download your armor .dat files for your Models.
2) Once the model is downloaded you need to rename the file into a numeric file. Get with Limes, Willy or Walied to get a range you can use. For testing purposes we are using 100420 range.
3) Add your new .dat Files into the .redemption Folder under custom Items. After this move onto step 2
Step Two - Add Your Model to the Server
1) In order to add your model to the client Open up Intellij Server and Navigate to Server>repository>items>info>info3.conf. (Each of the configuration file holds 10,000 configuration at max, they are organized where each 10,000 item have their own file where item with id of 20000 would be in info3.conf and so on.)
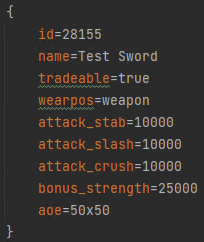
2) Once info3.conf is opened this is where you add in an item id and name while also modifying the stats. Move to the bottom of info3.conf and input your armor's stats and ID. (should look like the image below)
Below will be more in-depth on each Field and the numbers associated with them. (Credits to Walied for putting these together)
Fields
The format accepts the following fields, any other field will be automatically discarded a redundant:
Field
Data Type Required Condition idnumberyes unique namestringyes none costnumberno positive tradeablebooleanno none stackablebooleanno none worn_stackablebooleanno none attack_stabnumberno none attack_slashnumberno none attack_crushnumberno none attack_magicnumberno none attack_rangednumberno none defence_stabnumberno none defence_slashnumberno none defence_crushnumberno none defence_magicnumberno none defence_rangednumberno none bonus_strengthnumberno none bonus_prayernumberno none bonus_rangednumberno none bonus_magicnumberno none extra_meleedecimalno 1 >= n >= 0extra_magicdecimalno 1 >= n >= 0extra_rangedecimalno 1 >= n >= 0drop_ratedecimalno 1 >= n >= 0double_ratedecimalno 1 >= n >= 0luck_ratedecimalno 1 >= n >= 0wearposliteralno 15 >= n >= 0wearpos2literalno 15 >= n >= 0wearpos3literalno 15 >= n >= 0aoeliteralno positive Wearpos
The wearpos has 3 fields (wearpos, wearpos2, wearpos3) we are only using wearpos at the moment, the field can accept either a slot number which can range from
0to15inclusively or a slot literal which can be found in the table below: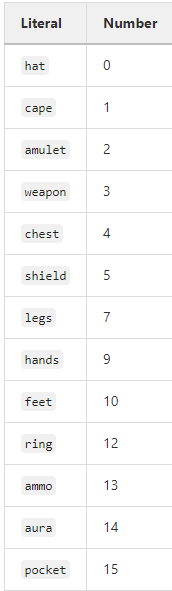
AoE
The area of effect field aoe can either accept a raw number value which range from
0to30inclusively or a literal which an be found in the table below:
3) Once your Item has been added into the server you will have to restart the server for it to be registered in. If you try to start the client without restarting the server you will get an error when you try and spawn your item "That Item ID does not exist".
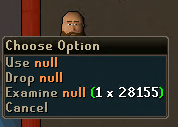
4) Once the server has restarted you can test and see if it is properly in by running the client and spawning the item the item will spawn as a Null however will have the Item ID. If it properly spawns as a Null continue to the next Step.
Step Three - Adding Your Armor into the Client
Now you're going to be taking the Item ID you put in and your Models you added earlier to the cache and adding those together to make the Item appear in the inventory and be wearable.
1) Open up the Client side of Intellij and Navigate to Client>src>main>java>com>redemption>ItemDef_4
2) the client side of ItemDef_4 is copy and paste Credits to Walied for that! All you have to do is copy the code from an item that's already added into the code to the item you're trying to put in.
You can see here I copy the Code from Hades Skull Scythe and Paste it where I want it at the top of the .java file.
3) Once the code is pasted all you have to do is edit the ID, Name, Description, dropModel, and wearModel to put the item in game. Zoom, xoff, yoff ,xan and yan are all how the item looks in the inventory. Some times the pasted code is fine for the inventory I would recommend changing it to how you think it should look. Below this will be what each field changes.
Basic Functions of each field
Zoom - Changes Zoom of item in inventory
xoff - Changes Movement of item Left to right (-30(left) or 30(right))
yoff - Changes Movement of item Up or Down (30(Up) or -30(down))
xan - Changes the up and Down rotation of the item in the inventory (never use negative values)
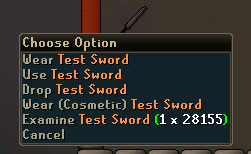
yan - Changes the circular rotational value (never use negative vaules)4) Now that your Armor is coded into the client once you launch the client the Null in your inventory now is the Armor you added if you didn't spawn the Null in your inventory use the format to spawn items to get your item ::item-itemid-1
Finished!
-
Step One - Download and Modify Your .dat file
1) First thing you need to do is download your weapon .dat file for your Model.
2) Once the model is downloaded you need to rename the file into a numeric file. Get with Limes, Willy or Walied to get a range you can use. For testing purposes we are using 100420 range.
3) Add your new .dat Files into the .redemption Folder under custom Items. After this move onto step 2
Step Two - Add Your Model to the Server
1) In order to add your model to the client Open up Intellij Server and Navigate to Server>repository>items>info>info3.conf. (Each of the configuration file holds 10,000 configuration at max, they are organized where each 10,000 item have their own file where item with id of 20000 would be in info3.conf and so on.)
2) Once info3.conf is opened this is where you add in an item id and name while also modifying the stats. Move to the bottom of info3.conf and input your weapon's stats and ID. (should look like the image below)
Below will be more in-depth on each Field and the numbers associated with them. (Credits to Walied for putting these together)
If you're looking to Increase attack speed or change attack styles you need to add your weapon id into the keywords section of Weapon.java server>src>main>java>com>redemption>server>game>combat>n>weapon.java and then choose what weapon you are trying to have the item use
Example: Skull Desimator9000 would be under GUN_MULTI_1TICK add your weapon Id in the Keywords section

Fields
The format accepts the following fields, any other field will be automatically discarded a redundant:
Field
Data Type Required Condition idnumberyes unique namestringyes none costnumberno positive tradeablebooleanno none stackablebooleanno none worn_stackablebooleanno none attack_stabnumberno none attack_slashnumberno none attack_crushnumberno none attack_magicnumberno none attack_rangednumberno none defence_stabnumberno none defence_slashnumberno none defence_crushnumberno none defence_magicnumberno none defence_rangednumberno none bonus_strengthnumberno none bonus_prayernumberno none bonus_rangednumberno none bonus_magicnumberno none extra_meleedecimalno 1 >= n >= 0extra_magicdecimalno 1 >= n >= 0extra_rangedecimalno 1 >= n >= 0drop_ratedecimalno 1 >= n >= 0double_ratedecimalno 1 >= n >= 0luck_ratedecimalno 1 >= n >= 0wearposliteralno 15 >= n >= 0wearpos2literalno 15 >= n >= 0wearpos3literalno 15 >= n >= 0aoeliteralno positive Wearpos
The wearpos has 3 fields (wearpos, wearpos2, wearpos3) we are only using wearpos at the moment, the field can accept either a slot number which can range from
0to15inclusively or a slot literal which can be found in the table below:AoE
The area of effect field aoe can either accept a raw number value which range from
0to30inclusively or a literal which an be found in the table below:3) Once your Item has been added into the server you will have to restart the server for it to be registered in. If you try to start the client without restarting the server you will get an error when you try and spawn your item "That Item ID does not exist".
4) Once the server has restarted you can test and see if it is properly in by running the client and spawning the item the item will spawn as a Null however will have the Item ID. If it properly spawns as a Null continue to the next Step.
Step Three - Adding Your Weapon into the Client
Now you're going to be taking the Item ID you put in and your Models you added earlier to the cache and adding those together to make the Item appear in the inventory and be wearable.
1) Open up the Client side of Intellij and Navigate to Client>src>main>java>com>redemption>ItemDef_4
2) the client side of ItemDef_4 is copy and paste Credits to Walied for that! All you have to do is copy the code from an item that's already added into the code to the item you're trying to put in.
You can see here I copy the Code from Hades Skull Scythe and Paste it where I want it at the top of the .java file.
3) Once the code is pasted all you have to do is edit the ID, Name, Description, dropModel, and wearModel to put the item in game. Zoom, xoff, yoff ,xan and yan are all how the item looks in the inventory. Some times the pasted code is fine for the inventory I would recommend changing it to how you think it should look. Below this will be what each field changes.
Basic Functions of each field
Zoom - Changes Zoom of item in inventory
xoff - Changes Movement of item Left to right (-30(left) or 30(right))
yoff - Changes Movement of item Up or Down (30(Up) or -30(down))
xan - Changes the up and Down rotation of the item in the inventory (never use negative values)
yan - Changes the circular rotational value (never use negative vaules)
4) Now that your Weapon is coded into the client once you launch the client the Null in your inventory now is the Weapon you added if you didn't spawn the Null in your inventory use the format to spawn items to get your item ::item-itemid-1

Finished!
-
A lot of work put into this by the team! Good job and thank you @Willy for keeping it all rolling!
-
I want that bow so bad... It looks so sick!
-
-
Good Luck Everyone!! Let's See you guys win some great Prizes!!
-
This update is bringing some good things back and some more a lot more fun into the game.
-
Came for the post
Got a thicc Nala
"I tried to figure out if Nala was thicc, now I'm an alcoholic." - Dutch -2021 -
I want all of the sold out bundles! I'm upset :c
-
Welcome to the server there is a lot to experience here, also make sure to join discord and talk with everyone! I hope to see you around in game!
-
Always putting out great updates. I'm mad excited to see what's in store for the future!
-
Buying plat status $4999.99!
-
What's a dreamscape?
-
Can't wait to see more coming from the team!
-
Love the Update and Congrats to DS for it's 6 years! Lets get at least 6 more!
-
I'm glad Willy is on the DS Team he's very knowledgeable and is always willing to help people!
-
They are great and try their best to be accessible. Big Shout Outs to them!
-
Hyped for this one just as much as everyone else!
-
Enjoying the hell out of the update can't wait to stream more! ?
-
Love all the boys as Devs now keep up the great work guys!
[December 2021] Redemptions Delight
in Redemption Monthly
Posted
Another great Job Heph and thanks to everyone who kept up with the loot drops!