Nex: Angel of Death Strategy Guide: Difference between revisions

From Redemption Wiki
Jump to navigation Jump to search
(Created page with "<br><br><br><br><br><br><br><br><br><br><br><br><br><br> {| class="fandomtable dropstable mw-collapsible mw-collapsed rdtable" style="text-align:center; max-width:auto" cellpadding="2" cellspacing="0" data-expandtext="show" data-collapsetext="hide" |- ! colspan="10" style="min-width:250px" | Nex: Angel of Death Strategy Guide |- |style="text-align:center;" | Nex: Angel of Death is a 4 phase boss fight <tabber> Overall mechanics by phase= <span style="font-size: 24px;">...")
 
No edit summary
Line 1: Line 1:
<br><br><br><br><br><br><br><br><br><br><br><br><br><br>
=== Requirements/Recommendations ===
{| class="fandomtable dropstable mw-collapsible mw-collapsed rdtable" style="text-align:center; max-width:auto" cellpadding="2" cellspacing="0" data-expandtext="show" data-collapsetext="hide"
|-
! colspan="10" style="min-width:250px" | Nex: Angel of Death Strategy Guide
|-
|style="text-align:center;" |


Nex: Angel of Death is a 4 phase boss fight <tabber>
Maximize your chances of success with the following requirements and recommendations:


Overall mechanics by phase=
{| class="wikitable" style="width:50%"
<span style="font-size: 24px;">Nex: Angel of Death</span> <br>
<center>
{| class="wikitable dropstable rdtable" style="text-align:center" cellpadding="2" cellspacing="0" data-expandtext="show" data-collapsetext="hide"
|-
|-
! colspan="10" style="min-width:250px" |Phases short explanation
! '''Requirement/Recommendation'''
! '''Notes'''
|-
|-
! scope="col" style="text-align:center;"|Phase 1
| Ability to deal 200m total damage (Required)
! scope="col" style="text-align:center;"|Phase 2
| Damage can come from attacking Nex: AOD, Pillars, Minions, Amalgmations, etc.
! scope="col" style="text-align:center;"|Phase 3
! scope="col" style="text-align:center;"|Phase 4
|-
|-
| scope="col" style="text-align:center;"|Melee Auto-attack
| [[Muscle Milk]] or [[Cursed Imbued Heart]] (Required)
| scope="col" style="text-align:center;"|Amalgamations
| Negates stat drain
| scope="col" style="text-align:center;"|Melee Auto-attack
| scope="col" style="text-align:center;"|Magic Auto-attack
|-
|-
| scope="col" style="text-align:center;"|Elemental Lockdown
| [[Doctor's Order]] or [[Extreme Donator Potion]] (Highly Recommended)
| scope="col" style="text-align:center;"|Praesuls(Umbra > Glacies > Cruor > Fumus)
| Boosts hitpoints by 50%
| scope="col" style="text-align:center;"|Smoke Blades
| scope="col" style="text-align:center;"|Mark of the Elements
|-
|-
| scope="col" style="text-align:center;"|Melee Auto-attack
| [[Rocktail]]/[[Rainbow Fish]]/[[Special Bandage]] (Highly Recommended)
| scope="col" style="text-align:center;"|
| Methods of healing
| scope="col" style="text-align:center;"|Unstable Smoke
| scope="col" style="text-align:center;"|Virus
|-
|-
| scope="col" style="text-align:center;"|Shadow Orbs
| Protection [[Prayer]] (Highly Recommended)
| scope="col" style="text-align:center;"|
| The Prestige 1 Prayer "Protection" provides 30% Protection from everything and Soulsplit Effect
| scope="col" style="text-align:center;"|Icicle Slam
| scope="col" style="text-align:center;"|Shadow Smash
|-
| scope="col" style="text-align:center;"|
| scope="col" style="text-align:center;"|
| scope="col" style="text-align:center;"|
| scope="col" style="text-align:center;"|Freeze
|-
| scope="col" style="text-align:center;"|
| scope="col" style="text-align:center;"|
| scope="col" style="text-align:center;"|
| scope="col" style="text-align:center;"|Blood Absorption
|}
|}
</center>
 
|-|In-depth description of each mechanic=
=== Special Attacks ===
{| class="wikitable dropstable rdtable" style="text-align:center" cellpadding="2" cellspacing="0" data-expandtext="show" data-collapsetext="hide"
 
{| class="wikitable" style="width:50%"
|-
|-
! colspan="10" style="min-width:250px" |Phases short explanation
! '''Special Attack'''
! '''Description'''
|-
|-
! scope="col" style="text-align:center;"|Ability Name
| Smoke
! scope="col" style="text-align:center;"|Explanation on how it works
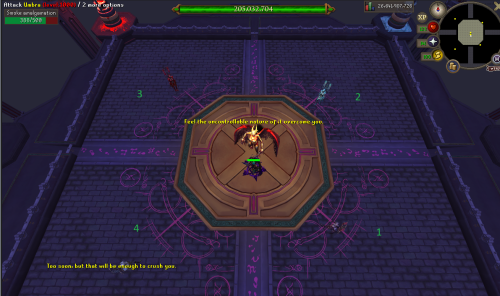
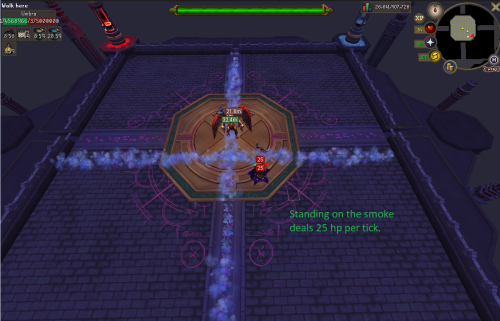
| Standing on the smoke deals 25 hp per tick. Avoid standing still when receiving the "Feel the smoke all around you. LET IT CONSUME YOU" message.
! scope="col" style="text-align:center;"|Additional Ability
|-
|-
| scope="col" style="text-align:center;"|*Auto-attack (Melee)
| colspan="2" | [[File:Smoke AOD.png|500px]]
| scope="col" style="text-align:center;"| Used in Phase 1 and 3
| scope="col" style="text-align:center;"|
|-
|-
| scope="col" style="text-align:center;"|*Auto-attack (Magic)
| Icicle Slam
| scope="col" style="text-align:center;"| Used in Phase 4
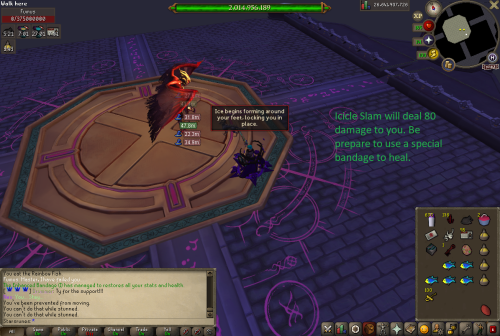
| Locks you in place for 8 game ticks, dealing 80 damage. Use a special bandage to heal.
| scope="col" style="text-align:center;"|
|-
|-
| scope="col" style="text-align:center;"|*<span id="Elemental Lockdown">Elemental Lockdown</span>
| colspan="2" | [[File:Icicle Slam AOD.png|500px]]
| scope="col" style="text-align:center;"|Nex yells "The elements, they call to me", turning to look into one of the four quadrants of the arena while she flies up into the air. She lands in the centre of the arena facing the same quadrant she faced prior to flying up and deals typeless damage to any players within a 3x3 area. After a few seconds ice stalagmites appear, dividing the arena's quadrants. They deal moderate damage if they are stood on.
Make sure you are about 2 - 3 game tiles away from impact tile
| scope="col" style="text-align:center;"|Three blood reavers with 35,000,000 life points spawn in the quadrants that Nex is not facing and begin advancing towards her. If a reaver reaches Nex, she yells "Taste the true power of a blood sacrifice", and deals 50% of the total hp the reaver had upon reaching Nex.
|-
|-
| scope="col" style="text-align:center;"|*Shadow orbs
| Unstable Smoke/Purple Pool
| scope="col" style="text-align:center;"|If Nex has not been phased 4-14 auto's after the Elemental Lockdown, she will yell "Let the shadow engulf you. Give in to it." She creates three red shadow orbs per player, placing them on the tiles that they are currently stood on. The orbs deal typeless damage every tick if the player is on top of one of them. Moving one space away from your location for each spawned orb is enough to avoid taking damage. These orbs remain on the floor for some time even after being initially evaded.
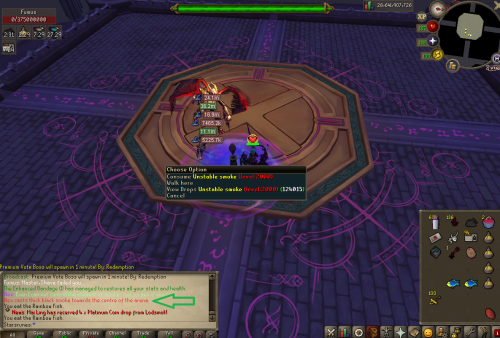
| Follow the black smoke to consume the purple pool. Damage taken is 140 per number of players standing on the purple smoke. Failure to consume the smoke in time can be lethal.
| scope="col" style="text-align:center;"|
|-
|-
| scope="col" style="text-align:center;"|*Amalgamations
| colspan="2" | [[File:Unstable Smoke AOD.png|500px]]
| scope="col" style="text-align:center;"|Nex will summon 4 amalgamations of the Anicent Magicks: shadow, ice, blood and smoke, each one being placed diagonally across from her to their respective crystals. The amalgamations will need to be destroyed before their bar is filled. They have 100,000,000 hp.
| scope="col" style="text-align:center;"|If the amalgamation is destroyed before the bar is filled a weaker Praesul of the corresponding element is summoned shortly after the crystal is destroyed. This will set the Praesuls' hp at 250,000,000.
If the amalgamation is not destroyed before the bar fills completely a stronger version of the corresponding Praesul will be summoned. This will set the Praesuls' hp at 500,000,000.
|-
|-
| scope="col" style="text-align:center;"|Praesuls (Umbra(Shadow) > Glacies(Ice) > Cruor(Blood) > Fumus(Smoke))
| Mark of the Elements
| scope="col" style="text-align:center;"|After killing the amalgamations 4 Praesuls representing the different elements of Ancient Magicks are spawned. The order in which the Praesuls need to be killed is '''VERY IMPORTANT'''. From first to last the order in which you need to kill them are: (Umbra(Shadow) > Glacies(Ice) > Cruor(Blood) > Fumus(Smoke)
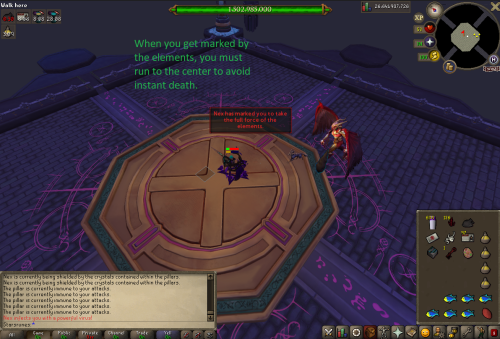
| When marked, a yellow timer appears; run to the center before it runs out to avoid instant death.
| scope="col" style="text-align:center;"|Pay very close attention if this order is not followed as the order of the pillars in the final phase relies on the order in this phase.
|-
|-
| scope="col" style="text-align:center;"|Smoke Blades
| colspan="2" | [[File:Mark of the Elements AOD.png|500px]]
| scope="col" style="text-align:center;"|Nex announces this attack with the line Feel the smoke all around you. LET IT CONSUME YOU.. She targets two random players with one line coming from the north and another from the east. This is indicated with the message Nex begins to draw smoke from the north/east towards you!. Three auto-attacks after this attack is initiated, a wall of smoke will appear in the same direction as the previous lines.  
|}
| scope="col" style="text-align:center;"|Upon receiving this message, take note of which direction in the smoke has targeted you and run to an adjacent wall that is opposite the direction of the smoke. For example, if you are targeted by a smoke wall from the north, stand next to either the east or west walls of the arena; for smoke from the east, stand on the north or south walls. If the players stand directly next to the correct wall, the smoke will not appear at all. Players who are targeted by the smoke walls should indicate which direction it is coming from to allow other players to quickly change positions if they cannot move.
 
|-
=== Phases ===
| scope="col" style="text-align:center;"|Unstable Smoke
| scope="col" style="text-align:center;"|Nex announces this attack with the line "Even I can not control the element of smoke... Let us see if you can." This is followed by the following message in the chat interface: "Nex casts a thick black smoke towards the centre of the arena.." Nex sends a small black cloud in a random direction. Upon landing, a smoke ring spawns. When someone moves into the ring, an unstable crystal will appear in the middle, which can be clicked on.


If no one activates the crystal, everyone will be hit for damage split over the number of players in the arena. Grabbing the crystal will deal lesser damage split evenly to everyone that was in the smoke ring when it was grabbed.
{| class="wikitable" style="width:50%"
| scope="col" style="text-align:center;"|
|-
|-
| scope="col" style="text-align:center;"|Icicle Slam
! '''Phase'''
| scope="col" style="text-align:center;"|Nex picks one or two targets (based on the amount of players in the arena); these players have a warning message when this occurs with the message stating Ice begins forming around your feet, locking you in place., which applies a bind and stun. Five ticks after this message, an icicle from above will slam onto the player, accompanied with the message "An icicle falls from the ceiling, locking you in place".
! '''Description'''
| scope="col" style="text-align:center;"|
|-
|-
| scope="col" style="text-align:center;"|Mark of the Elements
| Amalgamations
| scope="col" style="text-align:center;"|Nex targets a random player with the message Nex has marked you to take the full force of the elements. with large amount of smoke, shadow, blood and ice energy. A blue bar will appear above the targeted player.
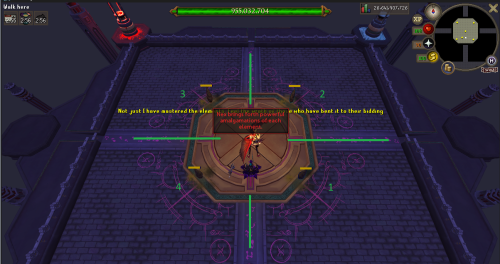
| Spawn at 955m hp. Stand on the green lines to avoid damage. Kill them in the order of south-east, then counter-clockwise.
| scope="col" style="text-align:center;"|When the bar fills energy from all four pillars converges on the player. If the player is not inside the dome when the elements impact the player, they will be instantly killed.
If the player survives the initial burst, a follow-up message will appear stating The shield blocks most of the damage, but you feel the elements boiling up inside. Like the instant-kill attack, a second blue bar appears over them, filling over time. Once this bar fills and disappears a large elemental bomb will appear at the location the player was standing, dealing typeless damage every two ticks if its radius is entered. The bombs last indefinitely until Nex is killed.  
|-
|-
| scope="col" style="text-align:center;"|Shadow Smash
| colspan="2" | [[File:Amalgmations AOD.png|500px]]
| scope="col" style="text-align:center;"|The shadow crystal allows Nex to place 3-5 shadow traps (similar to the shadow phase traps from the original encounter) underneath players, which will follow them around. 3 ticks after the traps are placed, they will go off, dealing typeless damage if a player is standing on top of one.
| scope="col" style="text-align:center;"|This crystal must be killed in the order that the Praesuls from Phase 2 were killed and has 500,000,000 hp.  In an ideal scenario this is the first crystal to fall. (Located in the South-East corner of the arena.)
|-
|-
| scope="col" style="text-align:center;"|Freeze
| Minions
| scope="col" style="text-align:center;"|The ice crystal allows Nex to have the ability to use an attack similar to the icicle prison from the previous phase.  
| Spawn after amalgamations in the same order. Kill them south-east, then counter-clockwise.
| scope="col" style="text-align:center;"|This crystal must be killed in the order that the Praesuls from Phase 2 were killed and has 500,000,000 hp.  In an ideal scenario this is the second crystal to fall. (Located in the North-East corner of the arena.)
|-
|-
| scope="col" style="text-align:center;"|Blood Absorption
| colspan="2" | [[File:Minions AOD.png|500px]]
| scope="col" style="text-align:center;"|Until the blood crystal is destroyed, Nex will be able to heal herself from her attacks, around 500-700 health for each successful attack regardless of the damage it inflicts.
| scope="col" style="text-align:center;"|This crystal must be killed in the order that the Praesuls from Phase 2 were killed and has 500,000,000 hp.  In an ideal scenario this is the third crystal to fall. (Located in the North-West corner of the arena.)
|-
|-
| scope="col" style="text-align:center;"|Virus
| Pillar Phase
| scope="col" style="text-align:center;"|The smoke crystal allows Nex to send viruses out at players, which drains their stats and overload timers. The virus has three stages; low, medium and high, with each stage indicated with a message in the game box. The state of the virus gradually increases as soon as the player obtains one; there is no way to cancel the virus.
| After killing minions, deal damage to Nex AoD until 1.5b hp. Attack the pillars in the same order as minions (south-east, then counter-clockwise).
| scope="col" style="text-align:center;"| This crystal must be killed in the order that the Praesuls from Phase 2 were killed and has 500,000,000 hp.  In an ideal scenario this is the last crystal to fall. (Located in the South-West corner of the arena.)
|}
|}


|-|Attack Rotation=
=== Full Run Video ===
Phase 1: <br>
<youtube>9qL3IHFAOMA</youtube>
'''Damage Nex and kill Reavers as soon as they spawn.'''<br>
 
Attack rotation:
=== Conclusion ===
{| class="wikitable" style="font-weight:700;text-align:center"
 
! width="80px" height="70px" |Phase 1
Mastering Nex: Angel of Death requires coordination, preparation, and a deep understanding of its mechanics. Use this guide as a foundation and adapt your strategies to ensure a victorious encounter.
| width="auto" | 4 [[#Auto-Attacks|Auto-Attacks]]
 
| width="auto" class="table-bg-purple" | [[#Elemental Lockdown|Elemental Lockdown]]
== References ==
| width="auto" | 4-14 (random) [[#Auto-Attacks|Auto-Attacks]]
The information in this guide was provided by Starsrunes.
| width="auto" class="table-bg-red" | [[#Shadow orbs|Shadow orbs]]
| width="auto" | 4-14 (random) [[#Auto-Attacks|Auto-Attacks]]
| width="auto" class="table-bg-yellow" | [[#Elemental Lockdown|Repeat from Elemental Lockdown]]
|}
<br>
Phase 2: <br>
'''Kill the Amalgamations before their bar is full then kill the Praesuls in order.'''<br>
Attack rotation:
{| class="wikitable" style="font-weight:700;text-align:center"
! width="80px" height="70px" |Phase 2
| width="Auto" class="table-bg-green" | [[#Amalgamations|Amalgamations]]
| width="Auto" class="table-bg-yellow" | [[#Praesuls (Umbra(Shadow) > Glacies(Ice) > Cruor(Blood) > Fumus(Smoke)|Praesuls (Umbra(Shadow) > Glacies(Ice) > Cruor(Blood) > Fumus(Smoke)]]
|}
<br>
Phase 3: <br>
'''Damage Nex while avoiding special attacks.'''<br>
Attack rotation:
{| class="wikitable" style="font-weight:700;text-align:center"
! width="80px" height="70px" |Phase 3
| width="auto" | 4-9 (random) [[#Auto-Attacks|Auto-Attacks]]
| width="auto" class="table-bg-green" | [[#Random skill|Random choice of Smoke Blades/Unstable Smoke/Icicle Slam]]
| width="auto" | 4-9 (random) [[#Auto-Attacks|Auto-Attacks]]
| width="auto" class="table-bg-red" | [[#Random skill|Random choice of Smoke Blades/Unstable Smoke/Icicle Slam (cannot be repeat of previous special used).]]
| width="auto" class="table-bg-blue" | Repeats cycle
|}
<br>
Phase 4: <br>
'''Kill the crystals in the corners of the room in the order you killed the Phase 2: Praesuls mechanic. These have 500,000,000 hp.'''<br>
Attack rotation:
{| class="wikitable" style="font-weight:700;text-align:center"
! width="80px" height="70px" |Phase 4
| width="auto" | [[#Auto-Attacks|Auto-Attacks]]
| width="auto" class="table-bg-red" | [[#Mark of the Elements|Mark of the Elements]]
| width="auto" class="table-bg-blue" | Repeats cycle
|}
</tabber>
|}
|}

Revision as of 18:02, 17 December 2023

Requirements/Recommendations

Maximize your chances of success with the following requirements and recommendations:

Requirement/Recommendation Notes
Ability to deal 200m total damage (Required) Damage can come from attacking Nex: AOD, Pillars, Minions, Amalgmations, etc.
Muscle Milk or Cursed Imbued Heart (Required) Negates stat drain
Doctor's Order or Extreme Donator Potion (Highly Recommended) Boosts hitpoints by 50%
Rocktail/Rainbow Fish/Special Bandage (Highly Recommended) Methods of healing
Protection Prayer (Highly Recommended) The Prestige 1 Prayer "Protection" provides 30% Protection from everything and Soulsplit Effect

Special Attacks

Special Attack Description
Smoke Standing on the smoke deals 25 hp per tick. Avoid standing still when receiving the "Feel the smoke all around you. LET IT CONSUME YOU" message.
Smoke AOD.png
Icicle Slam Locks you in place for 8 game ticks, dealing 80 damage. Use a special bandage to heal.
Icicle Slam AOD.png
Unstable Smoke/Purple Pool Follow the black smoke to consume the purple pool. Damage taken is 140 per number of players standing on the purple smoke. Failure to consume the smoke in time can be lethal.
Unstable Smoke AOD.png
Mark of the Elements When marked, a yellow timer appears; run to the center before it runs out to avoid instant death.
Mark of the Elements AOD.png

Phases

Phase Description
Amalgamations Spawn at 955m hp. Stand on the green lines to avoid damage. Kill them in the order of south-east, then counter-clockwise.
Amalgmations AOD.png
Minions Spawn after amalgamations in the same order. Kill them south-east, then counter-clockwise.
Minions AOD.png
Pillar Phase After killing minions, deal damage to Nex AoD until 1.5b hp. Attack the pillars in the same order as minions (south-east, then counter-clockwise).

Full Run Video

Conclusion

Mastering Nex: Angel of Death requires coordination, preparation, and a deep understanding of its mechanics. Use this guide as a foundation and adapt your strategies to ensure a victorious encounter.

References

The information in this guide was provided by Starsrunes.