
| Melee | |||||||||
|---|---|---|---|---|---|---|---|---|---|
| Helm | Body | Legs | |||||||
| Rune Full Helm | Rune Chainbody - Platebody | Rune Platelegs | |||||||
| / | Granite Platebody | Granite Platelegs | |||||||
| Warrior Helmet Fighter Hat |
Fighter Platebody | / | |||||||
| Berserker Helmet Helmet of Neitiznot |
/ | / | |||||||
| Dragon Full Helm | Dragon Chainbody - Platebody | Dragon Platelegs | |||||||
| Verac's Helm | Verac's Platebody | Verac's skirt | |||||||
| Guthan's Helm | Guthan's Platebody | Guthan's Platelegs | |||||||
| Dharok's Helm | Dharok's Platebody | Dharok's Platelegs | |||||||
| Torag's Helm | Torag's Platebody | Torag's Platelegs | |||||||
| / | Bandos Chestplate | Bandos Tassets | |||||||
| Statius Full Helm (Damage) | Statius Platebody (Damage) | Statius Plateskirt (Damage) | |||||||
| Vesta's Full Helm (Defence) | Vesta's Platebody (Defence) | Vesta's Plateskirt (Defence) | |||||||
| / | Torva Platebody | Torva Platelegs | |||||||
Battlegrounds: Difference between revisions
Jump to navigation
Jump to search

>Hc Drax No edit summary |
No edit summary |
||
| (17 intermediate revisions by 7 users not shown) | |||
| Line 1: | Line 1: | ||
{| class=" | {{LCod}} | ||
==What is Battlegrounds? == | |||
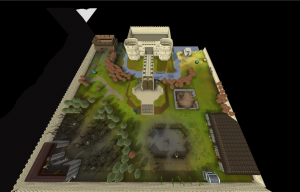
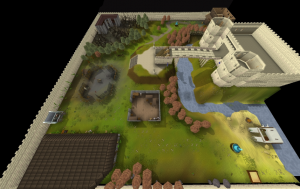
[[File:Bg portal.png|thumb|150x150px|Battleground Portal]]Battlegrounds is a last man standing minigame, fully customized by Redemption. | |||
<br> | |||
[[File:New BG.png|300x300px|left]] [[File:New BG 2.png|300x300px|right]] <br> | |||
<br> | |||
<br> | |||
<br> | |||
<br> | |||
<br> | |||
<br> | |||
<br> | |||
----- | |||
<br> | |||
=== Battlegrounds Rules ! === | |||
Within the Battlegrounds there's a few rules which MUST be obeyed, to keep the game fun ! | |||
*No Teaming ! (This could get you disqualified at events) | |||
*No PJ'ing ! (Attacking another player when they're starting to fight or just ended one). | |||
=== How do I get to Battlegrounds? === | |||
[[File:Battlegrounds Waiting Room.png|center|400x400px]] <br> | |||
You need to type in the command ;;bg or ;;arcade. Both will get you towards the room where the '''BattleGrounds''' portal stands. <br> | |||
In order for you to be able to enter, you will need to have removed all of your equipment, emptied your inventory into your bank and also have to type ;;callpet. (to make sure you don't have a pet out) | |||
== It has begun == | |||
You have entered the Battlegrounds ! What to do now ! First of all, you will notice you have received a gear setup ! Equip it all. | |||
== Staying Alive == | |||
The next section is based on what you need to do to stay alive ! | |||
=== Grimy Keys === | |||
[[File:Grimy Key.png|center|thumb|36x36px]] <br> | |||
Grimy keys are used to open up the Battleground chests which are scattered all over the map. These chests can give any kind of armour, weapons, potions, food and even runes. | |||
[[File:Battlegrounds Chest Loot.png|center|400x400px]] | |||
==== Getting Keys ==== | |||
How Could one obtain Keys though? | |||
*At the start of the game. You start with 2 keys no matter which gear set-up you receive. | |||
*Killing other Players (Any player = 1 / Target player = 2) | |||
*Killing the poisonous spiders - They drop the keys at a rate of 40% (unless you get a Ring of Chance) | |||
=== Refreshments === | |||
Refreshments can make the difference of life and death. They are the things that replenish your Hitpoints or Prayer or... | |||
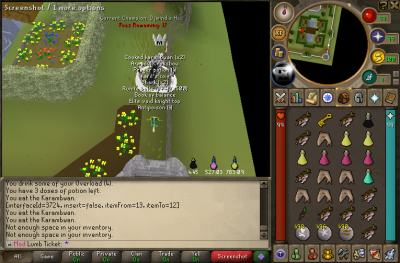
==== Fountain ==== | |||
[[File:Battlegrounds Fountain.png|center|400x400px]] <br> | |||
In front of the main entrance, there's a fountain, this fountain can be used every 5 minutes to restore everything; | |||
*Prayer | |||
*Hitpoints | |||
*Stats | |||
*Special attack. | |||
==== Altar ==== | |||
[[File:Battlegrounds Altar.png|center|400x400px]] <br> | |||
Inside the house, up in the North, there's an altar where you can restore your prayer points for free. <br> | |||
This is very convenient as you would no longer need Prayer potions. <br> | |||
Also useful for when you're in need of a quick prayer restore when fighting. <br> | |||
'''Keep in mind ! The Altar also has a 5 Minute cooldown! ''' | |||
=== Damage === | |||
What are the ways to get damage? Let's get into this deeper shall we. | |||
*Other Players: Well, this doesn't need further explaining I believe... | |||
*Spiders: The Spiders can hit back when you're trying to steal a Grimy Key ! So be aware ! | |||
*Fireballs: Random Fireballs will come from the skies ! Which can hit up to 50 DAMAGE ! So make sure you keep your health Above that at any cost when running around (also inside). | |||
*Standing Still: When standing still, you'd get hit 1's by the server, so keep running. | |||
*Game takes too long: Everybody gets hit 1's consistently. | |||
== Tips and Tricks == | |||
*Once the Battlegrounds starts, Nobody can attack each other for a decent amount of time. Be smart and use both of your keys to get the best gear possible ! | |||
*When opening the 2nd chest make sure to use your overload and get your hp up by eating karambwans first, as they can't be used to combo-heal you. | |||
*When you have drunk an Overload potion, you can drink saradomin brews without decreasing your stats, and they wont stall your account so you can keep fighting, unlike with sharks. | |||
*If you have your spellbook on lunars, you have a chance to get vengeance runes (death, earth, astral) from chests, although the Vengeance isn't as powerful as in OSRS. Keep this in mind. | |||
== Gear Guide == | |||
<center> | |||
{| class="wikitable dropstable rdtable" style="text-align:center" cellpadding="2" cellspacing="0" data-expandtext="show" data-collapsetext="hide" | |||
|- | |||
! colspan="10" style="min-width:250px" |Battlegrounds Gear | |||
|- | |||
! scope="col" style="text-align:center;"|Melee | |||
! scope="col" style="text-align:center;"|Mage | |||
! scope="col" style="text-align:center;"|Range | |||
|- | |||
|style="text-align:center;" |Rune Full set (Chain & Platebody) | |||
|style="text-align:center;" |Mystic Set | |||
|style="text-align:center;" |Spined Set | |||
|- | |||
|style="text-align:center;" |Granite Set | |||
|style="text-align:center;" |Enchanted Set | |||
|style="text-align:center;" |Black Dragonhide Set | |||
|- | |||
|style="text-align:center;" |Dragon Full Set (Chain & Platebody) | |||
|style="text-align:center;" |Skeletal Set | |||
|style="text-align:center;" |Karil's Set | |||
|- | |||
|style="text-align:center;" |Verac Set | |||
|style="text-align:center;" |Infinity Set | |||
|style="text-align:center;" |Armadyl Set | |||
|- | |||
|style="text-align:center;" |Guthans Set | |||
|style="text-align:center;" |Lunar Set | |||
|style="text-align:center;" |Morrigan's Set | |||
|- | |||
|style="text-align:center;" |Dharok Set | |||
|style="text-align:center;" |Ahrim's Set | |||
|style="text-align:center;" |Pernix Set | |||
|- | |||
|style="text-align:center;" |Torag's Set | |||
|style="text-align:center;" |Zurial's Set | |||
|style="text-align:center;" |/ | |||
|- | |||
|style="text-align:center;" |Bandos Set | |||
|style="text-align:center;" |Virtus Set | |||
|style="text-align:center;" |/ | |||
|- | |||
|style="text-align:center;" |Statius's Set (For Defence) <br> Vesta's Set (For Accuracy) | |||
|style="text-align:center;" |/ | |||
|style="text-align:center;" |/ | |||
|- | |||
|style="text-align:center;" |Torva Set | |||
|style="text-align:center;" |/ | |||
|style="text-align:center;" |/ | |||
|} | |||
<tabber> | |||
Melee Pieces= | |||
{| class="wikitable dropstable rdtable" style="text-align:center" cellpadding="2" cellspacing="0" data-expandtext="show" data-collapsetext="hide" | |||
|- | |||
! colspan="10" style="min-width:250px" |Melee | |||
|- | |||
! scope="col" style="text-align:center;"|Helm | |||
! scope="col" style="text-align:center;"|Body | |||
! scope="col" style="text-align:center;"|Legs | |||
|- | |||
|style="text-align:center;" |Rune Full Helm | |||
|style="text-align:center;" |Rune Chainbody - Platebody | |||
|style="text-align:center;" |Rune Platelegs | |||
|- | |||
|style="text-align:center;" |/ | |||
|style="text-align:center;" |Granite Platebody | |||
|style="text-align:center;" |Granite Platelegs | |||
|- | |||
|style="text-align:center;" |Warrior Helmet <br> Fighter Hat | |||
|style="text-align:center;" |Fighter Platebody | |||
|style="text-align:center;" |/ | |||
|- | |||
|style="text-align:center;" |Berserker Helmet <br> Helmet of Neitiznot | |||
|style="text-align:center;" |/ | |||
|style="text-align:center;" |/ | |||
|- | |||
|style="text-align:center;" |Dragon Full Helm | |||
|style="text-align:center;" |Dragon Chainbody - Platebody | |||
|style="text-align:center;" |Dragon Platelegs | |||
|- | |||
|style="text-align:center;" |Verac's Helm | |||
|style="text-align:center;" |Verac's Platebody | |||
|style="text-align:center;" |Verac's skirt | |||
|- | |||
|style="text-align:center;" |Guthan's Helm | |||
|style="text-align:center;" |Guthan's Platebody | |||
|style="text-align:center;" |Guthan's Platelegs | |||
|- | |||
|style="text-align:center;" |Dharok's Helm | |||
|style="text-align:center;" |Dharok's Platebody | |||
|style="text-align:center;" |Dharok's Platelegs | |||
|- | |||
|style="text-align:center;" |Torag's Helm | |||
|style="text-align:center;" |Torag's Platebody | |||
|style="text-align:center;" |Torag's Platelegs | |||
|- | |||
|style="text-align:center;" |/ | |||
|style="text-align:center;" |Bandos Chestplate | |||
|style="text-align:center;" |Bandos Tassets | |||
|- | |||
|style="text-align:center;" |Statius Full Helm (Damage) | |||
|style="text-align:center;" |Statius Platebody (Damage) | |||
|style="text-align:center;" |Statius Plateskirt (Damage) | |||
|- | |||
|style="text-align:center;" |Vesta's Full Helm (Defence) | |||
|style="text-align:center;" |Vesta's Platebody (Defence) | |||
|style="text-align:center;" |Vesta's Plateskirt (Defence) | |||
|- | |||
|style="text-align:center;" |/ | |||
|style="text-align:center;" |Torva Platebody | |||
|style="text-align:center;" |Torva Platelegs | |||
|- | |||
|} | |||
|-|Magic Pieces= | |||
{| class="wikitable dropstable rdtable" style="text-align:center" cellpadding="2" cellspacing="0" data-expandtext="show" data-collapsetext="hide" | |||
|- | |||
! colspan="10" style="min-width:250px" |Magic | |||
|- | |||
! scope="col" style="text-align:center;"|Helm | |||
! scope="col" style="text-align:center;"|Body | |||
! scope="col" style="text-align:center;"|Legs | |||
|- | |||
|style="text-align:center;" |Healer Hat <br> Mystic Hat | |||
|style="text-align:center;" |Mystic Body | |||
|style="text-align:center;" |Mystic Skirt | |||
|- | |||
|style="text-align:center;" |Enchanted Hat | |||
|style="text-align:center;" |Enchanted Body | |||
|style="text-align:center;" |Enchanted Skirt | |||
|- | |||
|style="text-align:center;" |Skeletal Hat | |||
|style="text-align:center;" |Skeletal Body | |||
|style="text-align:center;" |Skeletal Skirt | |||
|- | |||
|style="text-align:center;" |Infinity Hat | |||
|style="text-align:center;" |Infinity Body | |||
|style="text-align:center;" |Infinity Skirt | |||
|- | |||
|style="text-align:center;" |Lunar Hat | |||
|style="text-align:center;" |Lunar Body | |||
|style="text-align:center;" |Lunar Skirt | |||
|- | |||
|style="text-align:center;" |Ahrim's Hat | |||
|style="text-align:center;" |Ahrim's Body | |||
|style="text-align:center;" |Ahrim's Skirt | |||
|- | |||
|style="text-align:center;" |Zurial's Hat | |||
|style="text-align:center;" |Zurial's Body | |||
|style="text-align:center;" |Zurial's Skirt | |||
|- | |||
|style="text-align:center;" |Virtus Hat | |||
|style="text-align:center;" |Virtus Body | |||
|style="text-align:center;" |Virtus Skirt | |||
|- | |||
|} | |||
|-|Ranged Pieces= | |||
{| class="wikitable dropstable rdtable" style="text-align:center" cellpadding="2" cellspacing="0" data-expandtext="show" data-collapsetext="hide" | |||
|- | |||
! colspan="10" style="min-width:250px" |Ranged Gear detailed | |||
|- | |||
! scope="col" style="text-align:center;"|Helm | |||
! scope="col" style="text-align:center;"|Body | |||
! scope="col" style="text-align:center;"|Legs | |||
|- | |||
|style="text-align:center;" |/ | |||
|style="text-align:center;" |/ | |||
|style="text-align:center;" |Penance Skirt | |||
|- | |||
|style="text-align:center;" |Spined Hat | |||
|style="text-align:center;" |Spined Body | |||
|style="text-align:center;" |Spined Skirt | |||
|- | |||
|style="text-align:center;" |Robin Hood Hat | |||
|style="text-align:center;" |/ | |||
|style="text-align:center;" |/ | |||
|- | |||
|style="text-align:center;" | | |||
|style="text-align:center;" |Black Dragonhide Body | |||
|style="text-align:center;" |Black Dragonhide Chaps | |||
|- | |||
|style="text-align:center;" |Karil's Coif | |||
|style="text-align:center;" |Karil's Body | |||
|style="text-align:center;" |Karil's Skirt | |||
|- | |||
|style="text-align:center;" |Archer Helm | |||
|style="text-align:center;" |/ | |||
|style="text-align:center;" |/ | |||
|- | |||
|style="text-align:center;" |Armadyl Helm | |||
|style="text-align:center;" |Armadyl's Body | |||
|style="text-align:center;" |Armadyl's Chaps | |||
|- | |||
|style="text-align:center;" |/ | |||
|style="text-align:center;" |Morrigan's Body | |||
|style="text-align:center;" |Morrigan's Chaps | |||
|- | |||
|style="text-align:center;" |Pernix Coif | |||
|style="text-align:center;" |Pernix Body | |||
|style="text-align:center;" |Pernix Chaps | |||
|- | |||
|} | |||
</tabber> | |||
<tabber> | |||
Melee Weapons= | |||
{| class="wikitable dropstable rdtable" style="text-align:center" cellpadding="2" cellspacing="0" data-expandtext="show" data-collapsetext="hide" | |||
|- | |||
! colspan="10" style="min-width:250px" |Melee | |||
|- | |||
! scope="col" style="text-align:center;"|Mainhand | |||
|- | |||
|style="text-align:center;" |Granite Maul (SA) | |||
|- | |||
|style="text-align:center;" |Dragon Mace (SA) | |||
|- | |||
|style="text-align:center;" |Dragon Halberd (SA) | |||
|- | |||
|style="text-align:center;" |Dragon Dagger | |||
|- | |||
|style="text-align:center;" |Obsidian Maul | |||
|- | |||
|style="text-align:center;" |Guthan's Spear | |||
|- | |||
|style="text-align:center;" |Verac's Flail | |||
|- | |||
|style="text-align:center;" |Barrelchest Anchor (SA) | |||
|- | |||
|style="text-align:center;" |Dragon Battleaxe | |||
|- | |||
|style="text-align:center;" |Dragon Scimitar | |||
|- | |||
|style="text-align:center;" |Zamorakian Spear | |||
|- | |||
|style="text-align:center;" |Abyssal Whip | |||
|- | |||
|style="text-align:center;" |Zammorak / Saradomin / Bandos / Armadyl Godsword <br> (Same stats, Unique special Attack) (SA) | |||
|- | |||
|style="text-align:center;" |Vesta's Spear <br> Vesta's Longsword | |||
|- | |||
|style="text-align:center;" |Statius Warhammer (SA) | |||
|- | |||
|style="text-align:center;" |Chaotic Warhammer | |||
|- | |||
|style="text-align:center;" |Chaotic Rapier | |||
|- | |||
|style="text-align:center;" |Chaotic Longsword | |||
|} | |||
|-|Magic Weapons= | |||
{| class="wikitable dropstable rdtable" style="text-align:center" cellpadding="2" cellspacing="0" data-expandtext="show" data-collapsetext="hide" | |||
|- | |||
! colspan="10" style="min-width:250px" |Magic | |||
|- | |||
! scope="col" style="text-align:center;"|Mainhand | |||
|- | |||
|style="text-align:center;" |Saradomin Staff | |||
|- | |||
|style="text-align:center;" |Guthix Staff | |||
|- | |||
|style="text-align:center;" |Zamorak Staff | |||
|- | |||
|style="text-align:center;" |Ahrim's Staff | |||
|- | |||
|style="text-align:center;" |Ancient Staff | |||
|- | |||
|style="text-align:center;" |Staff of Light | |||
|- | |||
|style="text-align:center;" |Master Wand | |||
|- | |||
|style="text-align:center;" |Chaotic Staff | |||
|} | |||
|-|Ranged Weapons= | |||
{| class="wikitable dropstable rdtable" style="text-align:center" cellpadding="2" cellspacing="0" data-expandtext="show" data-collapsetext="hide" | |||
|- | |||
! colspan="10" style="min-width:250px" |Ranged | |||
|- | |||
! scope="col" style="text-align:center;"|Mainhand | |||
! scope="col" style="text-align:center;"|Shield | |||
|- | |||
|style="text-align:center;" |Dragon Dart | |||
|- | |||
|style="text-align:center;" |Crystal Bow | |||
|- | |||
|style="text-align:center;" |Karil's Crossbow | |||
|- | |||
|style="text-align:center;" |Magic Shortbow (SA) | |||
|- | |||
|style="text-align:center;" |Morrigans Throwing Axe | |||
|- | |||
|style="text-align:center;" |Morrigans Javeline (SA) | |||
|- | |||
|style="text-align:center;" |Dark Bow (SA) | |||
|- | |||
|style="text-align:center;" |Rune Crossbow | |||
|- | |||
|style="text-align:center;" |Armadyl Crossbow | |||
|- | |||
|style="text-align:center;" |Chaotic Crossbow | |||
|} | |||
</tabber> | |||
<tabber> | |||
Gloves & Boots= | |||
{| class="wikitable sortable jquery-tablesorter" style="border-color:red;font-size:13px;line-height:21px;width:347px;style=" cellpadding="2" cellspacing="0" text-align:center; " | |||
|- | |||
|style="text-align:center;" |Gloves | |||
|style="text-align:center;" |[[File:Attack.png|center]] | |||
|style="text-align:center;" |[[File:Magic.png|center]] | |||
|style="text-align:center;" |[[File:Ranged.png|center]] | |||
|style="text-align:center;" |Boots | |||
|style="text-align:center;" |[[File:Attack.png|center]] | |||
|style="text-align:center;" |[[File:Magic.png|center]] | |||
|style="text-align:center;" |[[File:Ranged.png|center]] | |||
|- | |||
|style="text-align:center;" |Void Knight Gloves <br> (Works with Void Set) | |||
|style="text-align:center;" |[[File:CheckMark.png|50px]] | |||
|style="text-align:center;" |[[File:CheckMark.png|50px]] | |||
|style="text-align:center;" |[[File:CheckMark.png|50px]] | |||
|style="text-align:center;" |Rock Climbing Boots | |||
|style="text-align:center;" |[[File:CheckMark.png|50px]] | |||
|style="text-align:center;" |[[File:Nope.png|50px]] | |||
|style="text-align:center;" |[[File:Nope.png|50px]] | |||
|- | |||
|style="text-align:center;" |Combat Bracelet | |||
|style="text-align:center;" |[[File:CheckMark.png|50px]] | |||
|style="text-align:center;" |[[File:CheckMark.png|50px]] | |||
|style="text-align:center;" |[[File:CheckMark.png|50px]] | |||
|style="text-align:center;" |Rune Boots | |||
|style="text-align:center;" |[[File:CheckMark.png|50px]] | |||
|style="text-align:center;" |[[File:Nope.png|50px]] | |||
|style="text-align:center;" |[[File:Nope.png|50px]] | |||
|- | |||
|style="text-align:center;" |Regen Bracelet | |||
|style="text-align:center;" |[[File:CheckMark.png|50px]] | |||
|style="text-align:center;" |[[File:CheckMark.png|50px]] | |||
|style="text-align:center;" |[[File:CheckMark.png|50px]] | |||
|style="text-align:center;" |Bandos Boots (Def) <br> (Dragon Boots (Off) | |||
|style="text-align:center;" |[[File:CheckMark.png|50px]] | |||
|style="text-align:center;" |[[File:Nope.png|50px]] | |||
|style="text-align:center;" |[[File:Nope.png|50px]] | |||
|- | |||
|style="text-align:center;" |Rune Gloves | |||
|style="text-align:center;" |[[File:CheckMark.png|50px]] | |||
|style="text-align:center;" |[[File:CheckMark.png|50px]] | |||
|style="text-align:center;" |[[File:CheckMark.png|50px]] | |||
|style="text-align:center;" |Steadfast Boots | |||
|style="text-align:center;" |[[File:CheckMark.png|50px]] | |||
|style="text-align:center;" |[[File:Nope.png|50px]] | |||
|style="text-align:center;" |[[File:Nope.png|50px]] | |||
|- | |||
|style="text-align:center;" |Black Vambraces | |||
|style="text-align:center;" |[[File:Nope.png|50px]] | |||
|style="text-align:center;" |[[File:Nope.png|50px]] | |||
|style="text-align:center;" |[[File:CheckMark.png|50px]] | |||
|style="text-align:center;" |Infinity Boots | |||
|style="text-align:center;" |[[File:Nope.png|50px]] | |||
|style="text-align:center;" |[[File:CheckMark.png|50px]] | |||
|style="text-align:center;" |[[File:Nope.png|50px]] | |||
|- | |||
|style="text-align:center;" |Black Spiked Vambraces | |||
|style="text-align:center;" |[[File:CheckMark.png|50px]] | |||
|style="text-align:center;" |[[File:Nope.png|50px]] | |||
|style="text-align:center;" |[[File:CheckMark.png|50px]] | |||
|style="text-align:center;" |Ragefire Boots | |||
|style="text-align:center;" |[[File:Nope.png|50px]] | |||
|style="text-align:center;" |[[File:CheckMark.png|50px]] | |||
|style="text-align:center;" |[[File:Nope.png|50px]] | |||
|- | |||
|style="text-align:center;" |Mystic Gloves | |||
|style="text-align:center;" |[[File:Nope.png|50px]] | |||
|style="text-align:center;" |[[File:CheckMark.png|50px]] | |||
|style="text-align:center;" |[[File:Nope.png|50px]] | |||
|style="text-align:center;" |Runner Boots | |||
|style="text-align:center;" |[[File:CheckMark.png|50px]] | |||
|style="text-align:center;" |[[File:Nope.png|50px]] | |||
|style="text-align:center;" |[[File:Nope.png|50px]] | |||
|- | |||
|style="text-align:center;" |Infinity Gloves | |||
|style="text-align:center;" |[[File:Nope.png|50px]] | |||
|style="text-align:center;" |[[File:CheckMark.png|50px]] | |||
|style="text-align:center;" |[[File:Nope.png|50px]] | |||
|style="text-align:center;" |Ranger Boots | |||
|style="text-align:center;" |[[File:Nope.png|50px]] | |||
|style="text-align:center;" |[[File:Nope.png|50px]] | |||
|style="text-align:center;" |[[File:CheckMark.png|50px]] | |||
|- | |||
|style="text-align:center;" |Barrows Gloves | |||
|style="text-align:center;" |[[File:CheckMark.png|50px]] | |||
|style="text-align:center;" |[[File:CheckMark.png|50px]] | |||
|style="text-align:center;" |[[File:CheckMark.png|50px]] | |||
|style="text-align:center;" |Glaiven Boots | |||
|style="text-align:center;" |[[File:Nope.png|50px]] | |||
|style="text-align:center;" |[[File:Nope.png|50px]] | |||
|style="text-align:center;" |[[File:CheckMark.png|50px]] | |||
|} | |||
|-|Capes & Amulets= | |||
{| class="wikitable sortable jquery-tablesorter" style="border-color:red;font-size:13px;line-height:21px;width:347px;style=" cellpadding="2" cellspacing="0" text-align:center; " | |||
|- | |||
|style="text-align:center;" |Capes | |||
|style="text-align:center;" |[[File:Attack.png|center]] | |||
|style="text-align:center;" |[[File:Magic.png|center]] | |||
|style="text-align:center;" |[[File:Ranged.png|center]] | |||
|style="text-align:center;" |Amulets | |||
|style="text-align:center;" |[[File:Attack.png|center]] | |||
|style="text-align:center;" |[[File:Magic.png|center]] | |||
|style="text-align:center;" |[[File:Ranged.png|center]] | |||
|- | |||
|style="text-align:center;" |Ava's Accumulator | |||
|style="text-align:center;" |[[File:Nope.png|50px]] | |||
|style="text-align:center;" |[[File:Nope.png|50px]] | |||
|style="text-align:center;" |[[File:CheckMark.png|50px]] | |||
|style="text-align:center;" |Berserker's Necklace | |||
|style="text-align:center;" |[[File:CheckMark.png|50px]] | |||
|style="text-align:center;" |[[File:Nope.png|50px]] | |||
|style="text-align:center;" |[[File:Nope.png|50px]] | |||
|- | |||
|style="text-align:center;" |Ardougne Cape | |||
|style="text-align:center;" |[[File:CheckMark.png|50px]] | |||
|style="text-align:center;" |[[File:Nope.png|50px]] | |||
|style="text-align:center;" |[[File:Nope.png|50px]] | |||
|style="text-align:center;" |Arcane Pulse Necklace <br> Arcane Blast Necklace | |||
|style="text-align:center;" |[[File:Nope.png|50px]] | |||
|style="text-align:center;" |[[File:CheckMark.png|50px]] | |||
|style="text-align:center;" |[[File:Nope.png|50px]] | |||
|- | |||
|style="text-align:center;" |Obsidian Cape | |||
|style="text-align:center;" |[[File:CheckMark.png|50px]] | |||
|style="text-align:center;" |[[File:CheckMark.png|50px]] | |||
|style="text-align:center;" |[[File:CheckMark.png|50px]] | |||
|style="text-align:center;" |Amulet of Power | |||
|style="text-align:center;" |[[File:CheckMark.png|50px]] | |||
|style="text-align:center;" |[[File:CheckMark.png|50px]] | |||
|style="text-align:center;" |[[File:CheckMark.png|50px]] | |||
|- | |||
|style="text-align:center;" |Tokkhar Cape | |||
|style="text-align:center;" |[[File:CheckMark.png|50px]] | |||
|style="text-align:center;" |[[File:Nope.png|50px]] | |||
|style="text-align:center;" |[[File:Nope.png|50px]] | |||
|style="text-align:center;" |Amulet of Magic | |||
|style="text-align:center;" |[[File:Nope.png|50px]] | |||
|style="text-align:center;" |[[File:CheckMark.png|50px]] | |||
|style="text-align:center;" |[[File:Nope.png|50px]] | |||
|- | |||
|style="text-align:center;" |Fire Cape | |||
|style="text-align:center;" |[[File:CheckMark.png|50px]] | |||
|style="text-align:center;" |[[File:Nope.png|50px]] | |||
|style="text-align:center;" |[[File:Nope.png|50px]] | |||
|style="text-align:center;" |Amulet of Accuracy | |||
|style="text-align:center;" |[[File:Nope.png|50px]] | |||
|style="text-align:center;" |[[File:Nope.png|50px]] | |||
|style="text-align:center;" |[[File:CheckMark.png|50px]] | |||
|- | |||
|style="text-align:center;" |Zamorak Cape | |||
|style="text-align:center;" |[[File:Nope.png|50px]] | |||
|style="text-align:center;" |[[File:CheckMark.png|50px]] | |||
|style="text-align:center;" |[[File:Nope.png|50px]] | |||
|style="text-align:center;" |Amulet of Strength | |||
|style="text-align:center;" |[[File:CheckMark.png|50px]] | |||
|style="text-align:center;" |[[File:Nope.png|50px]] | |||
|style="text-align:center;" |[[File:Nope.png|50px]] | |||
|- | |||
|style="text-align:center;" |Saradomin Cape | |||
|style="text-align:center;" |[[File:Nope.png|50px]] | |||
|style="text-align:center;" |[[File:CheckMark.png|50px]] | |||
|style="text-align:center;" |[[File:Nope.png|50px]] | |||
|style="text-align:center;" |Amulet of Glory | |||
|style="text-align:center;" |[[File:CheckMark.png|50px]] | |||
|style="text-align:center;" |[[File:CheckMark.png|50px]] | |||
|style="text-align:center;" |[[File:CheckMark.png|50px]] | |||
|- | |||
|style="text-align:center;" |/ | |||
|style="text-align:center;" |/ | |||
|style="text-align:center;" |/ | |||
|style="text-align:center;" |/ | |||
|style="text-align:center;" |Amulet of Ranging | |||
|style="text-align:center;" |[[File:Nope.png|50px]] | |||
|style="text-align:center;" |[[File:Nope.png|50px]] | |||
|style="text-align:center;" |[[File:CheckMark.png|50px]] | |||
|- | |||
|style="text-align:center;" |/ | |||
|style="text-align:center;" |/ | |||
|style="text-align:center;" |/ | |||
|style="text-align:center;" |/ | |||
|style="text-align:center;" |Fury Amulet | |||
|style="text-align:center;" |[[File:CheckMark.png|50px]] | |||
|style="text-align:center;" |[[File:CheckMark.png|50px]] | |||
|style="text-align:center;" |[[File:CheckMark.png|50px]] | |||
|} | |||
|-|Shields / Offhands= | |||
{| class="wikitable sortable jquery-tablesorter" style="border-color:red;font-size:13px;line-height:21px;width:347px;style=" cellpadding="2" cellspacing="0" text-align:center; " | |||
|- | |||
|style="text-align:center;" |Shields / Offhands | |||
|style="text-align:center;" |[[File:Attack.png|center]] | |||
|style="text-align:center;" |[[File:Magic.png|center]] | |||
|style="text-align:center;" |[[File:Ranged.png|center]] | |||
|style="text-align:center;" |[[File:Defence.png|center]] | |||
|- | |||
| scope="col" style="text-align:center;" style="border-bottom:1px solid white"|Zamorak Book | |||
| scope="col" style="text-align:center;" style="border-bottom:1px solid white"|[[File:CheckMark.png|50px]] | |||
| scope="col" style="text-align:center;" style="border-bottom:1px solid white"|[[File:CheckMark.png|50px]] | |||
| scope="col" style="text-align:center;" style="border-bottom:1px solid white"|[[File:CheckMark.png|50px]] | |||
| scope="col" style="text-align:center;" style="border-bottom:1px solid white"|[[File:CheckMark.png|50px]] | |||
|- | |||
| scope="col" style="text-align:center;" style="border-bottom:1px solid white"|Rune Berserker Shield <br> Dragon Square Shield <br> Obby Shield <br>Dragon Kiteshield <br> Rune Defender <br> Dragon Defender <br> Dragon Fireshield | |||
| scope="col" style="text-align:center;" style="border-bottom:1px solid white"|[[File:CheckMark.png|50px]] | |||
| scope="col" style="text-align:center;" style="border-bottom:1px solid white"|[[File:Nope.png|50px]] | |||
| scope="col" style="text-align:center;" style="border-bottom:1px solid white"|[[File:Nope.png|50px]] | |||
| scope="col" style="text-align:center;" style="border-bottom:1px solid white"|[[File:Nope.png|50px]] | |||
|- | |||
| scope="col" style="text-align:center;" style="border-bottom:1px solid white"|Saradomin Book <br> Book of Balance <br> Mages Book <br> Tome of Frost <br> Farseer Shield | |||
| scope="col" style="text-align:center;" style="border-bottom:1px solid white"|[[File:Nope.png|50px]] | |||
| scope="col" style="text-align:center;" style="border-bottom:1px solid white"|[[File:CheckMark.png|50px]] | |||
| scope="col" style="text-align:center;" style="border-bottom:1px solid white"|[[File:Nope.png|50px]] | |||
| scope="col" style="text-align:center;" style="border-bottom:1px solid white"|[[File:Nope.png|50px]] | |||
|- | |- | ||
| scope="col" style="text-align:center;" style="border-bottom:1px solid white"|Crystal Shield <br> Eagle Eye Kite | |||
| scope="col" style="text-align:center;" style="border-bottom:1px solid white"|[[File:Nope.png|50px]] | |||
| scope="col" style="text-align:center;" style="border-bottom:1px solid white"|[[File:Nope.png|50px]] | |||
| scope="col" style="text-align:center;" style="border-bottom:1px solid white"|[[File:CheckMark.png|50px]] | |||
| scope="col" style="text-align:center;" style="border-bottom:1px solid white"|[[File:Nope.png|50px]] | |||
|- | |- | ||
|[[File: | | scope="col" style="text-align:center;" style="border-bottom:1px solid white"|Crystal Shield <br> Spirit Shield <br> Spectral - Arcane - Elysian Spirit Shield | ||
| scope="col" style="text-align:center;" style="border-bottom:1px solid white"|[[File:CheckMark.png|50px]] | |||
| scope="col" style="text-align:center;" style="border-bottom:1px solid white"|[[File:CheckMark.png|50px]] | |||
| scope="col" style="text-align:center;" style="border-bottom:1px solid white"|[[File:CheckMark.png|50px]] | |||
| scope="col" style="text-align:center;" style="border-bottom:1px solid white"|[[File:CheckMark.png|50px]] | |||
|} | |||
<p style="text-align:center;"> | </tabber> | ||
</center> | |||
== The Finale == | |||
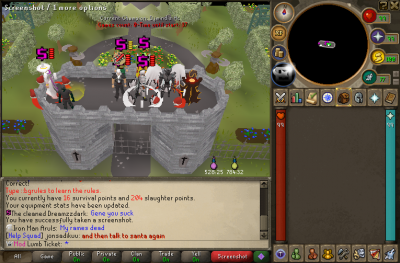
[[File:Battlegrounds Finale.png|center|400x400px]] <br> | |||
When there are only 4 players left, everybody will have 15 seconds before they will be teleported for the finals. <br> | |||
When teleported to the final (if you have room in inventory) you get a key for free. | |||
At the finals you can only use 1 key, so there's no reason to hold on to multiple keys | |||
* Use this key wisely, if you're full on food wait till you have enough room to loot the food from the chest. | |||
== Rewards == | |||
<p style="text-align:center;"> | |||
</p> | |||
{| class="article-table article-table-selected" border="1" cellpadding="1" cellspacing="1" style="width: 680px;" | |||
|- | |||
! scope="col" style="text-align:center;" |Rewards | |||
|- | |||
|[[File:Battlegrounds Shop.png|center|550px]] | |||
{| class="article-table" | {| class="article-table" | ||
!Reward | !Reward | ||
!Picture | |||
!Cost | !Cost | ||
! | ! | ||
Effect | |||
|- | |||
|[[Battlegrounds Keys]] | |||
|[[File:Battlegrounds Key.png|centre|thumb|40x40px]] | |||
|1 Survival and 20 Slaughter Points | |||
|- | |- | ||
|Thor's Hammer | |[[Thor's Hammer]] | ||
|[[File:Thors Hammer icon.png|centre|thumb|40x40px]] | |||
|10 Survival and 500 Slaughter Points | |10 Survival and 500 Slaughter Points | ||
|20% double drop rate & 2% drop rate | |20% double drop rate & 2% drop rate | ||
|- | |- | ||
|Captain America Shield | |[[Captain America Shield]] | ||
|[[File:Captain America Shield Icon.png|center|thumb|36x36px]] | |||
|5 Survival and 200 Slaughter Points | |5 Survival and 200 Slaughter Points | ||
|1 prayer gain per hit | |1 prayer gain per hit | ||
|- | |- | ||
|Kril Full Helm | |[[Kril Set|Kril Full Helm]] | ||
|[[File:Kril Set Helm.png|thumb|center|36x36px]] | |||
|5 Survival and 200 Slaughter Points | |5 Survival and 200 Slaughter Points | ||
|Currently no effect | |Currently no effect | ||
|- | |- | ||
|Kril Platebody | |[[Kril Set|Kril Platebody]] | ||
|[[File:Kril Set Body.png|center|thumb|36x36px]] | |||
|<span>5 Survival and 200 Slaughter Points</span> | |<span>5 Survival and 200 Slaughter Points</span> | ||
|Currently no effect | |Currently no effect | ||
|- | |- | ||
|Kril Platelegs | |[[Kril Set|Kril Platelegs]] | ||
|[[File:Kril Set Legs.png|center|thumb|36x36px]] | |||
|<span>5 Survival and 200 Slaughter Points</span> | |<span>5 Survival and 200 Slaughter Points</span> | ||
|Currently no effect | |Currently no effect | ||
|- | |- | ||
|Rogue | |[[Rouge Helm (PVM)]] | ||
|[[File:Rogue Set Helm.jpg|center|thumb|36x36px]] | |||
|<span>5 Survival and 200 Slaughter Points</span> | |<span>5 Survival and 200 Slaughter Points</span> | ||
|Set effect - 20% double drop rate & 2% drop rate | |Set effect - 20% double drop rate & 2% drop rate | ||
|- | |- | ||
|Rogue | |[[Rouge Platebody (PVM)]] | ||
|[[File:Rogue Set Body.jpg|center|thumb|36x36px]] | |||
|<span>5 Survival and 200 Slaughter Points</span> | |<span>5 Survival and 200 Slaughter Points</span> | ||
|<span>Set effect - 20% double drop rate & 2% drop rate</span> | |<span>Set effect - 20% double drop rate & 2% drop rate</span> | ||
|- | |- | ||
|Rogue | |[[Rouge Platelegs (PVM)]] | ||
|[[File:Rogue Set Legs.jpg|center|thumb|36x36px]] | |||
|<span>5 Survival and 200 Slaughter Points</span> | |<span>5 Survival and 200 Slaughter Points</span> | ||
|<span>Set effect - 20% double drop rate & 2% drop rate</span> | |<span>Set effect - 20% double drop rate & 2% drop rate</span> | ||
|- | |- | ||
|Rogue Cape | |[[Rouge Cape (PVM)]] | ||
|[[File:Rogue Set Cape.jpg|center|thumb|36x36px]] | |||
|<span>5 Survival and 200 Slaughter Points</span> | |<span>5 Survival and 200 Slaughter Points</span> | ||
|<span>Set effect - 20% double drop rate & 2% drop rate</span> | |<span>Set effect - 20% double drop rate & 2% drop rate</span> | ||
|} | |} | ||
<p style="text-align:center;"></p> | <p style="text-align:center;"> | ||
</p> | |||
|} | |} | ||
[[Category:Minigames]] | [[Category:Minigames]] | ||
Latest revision as of 22:57, 18 April 2023
This page contains Legacy Content that is considered outdated and/or useless.
What is Battlegrounds?[edit | edit source]
Battlegrounds is a last man standing minigame, fully customized by Redemption.


Battlegrounds Rules ![edit | edit source]
Within the Battlegrounds there's a few rules which MUST be obeyed, to keep the game fun !
- No Teaming ! (This could get you disqualified at events)
- No PJ'ing ! (Attacking another player when they're starting to fight or just ended one).
How do I get to Battlegrounds?[edit | edit source]

You need to type in the command ;;bg or ;;arcade. Both will get you towards the room where the BattleGrounds portal stands.
In order for you to be able to enter, you will need to have removed all of your equipment, emptied your inventory into your bank and also have to type ;;callpet. (to make sure you don't have a pet out)
It has begun[edit | edit source]
You have entered the Battlegrounds ! What to do now ! First of all, you will notice you have received a gear setup ! Equip it all.
Staying Alive[edit | edit source]
The next section is based on what you need to do to stay alive !
Grimy Keys[edit | edit source]
Grimy keys are used to open up the Battleground chests which are scattered all over the map. These chests can give any kind of armour, weapons, potions, food and even runes.

Getting Keys[edit | edit source]
How Could one obtain Keys though?
- At the start of the game. You start with 2 keys no matter which gear set-up you receive.
- Killing other Players (Any player = 1 / Target player = 2)
- Killing the poisonous spiders - They drop the keys at a rate of 40% (unless you get a Ring of Chance)
Refreshments[edit | edit source]
Refreshments can make the difference of life and death. They are the things that replenish your Hitpoints or Prayer or...
Fountain[edit | edit source]

In front of the main entrance, there's a fountain, this fountain can be used every 5 minutes to restore everything;
- Prayer
- Hitpoints
- Stats
- Special attack.
Altar[edit | edit source]

Inside the house, up in the North, there's an altar where you can restore your prayer points for free.
This is very convenient as you would no longer need Prayer potions.
Also useful for when you're in need of a quick prayer restore when fighting.
Keep in mind ! The Altar also has a 5 Minute cooldown!
Damage[edit | edit source]
What are the ways to get damage? Let's get into this deeper shall we.
- Other Players: Well, this doesn't need further explaining I believe...
- Spiders: The Spiders can hit back when you're trying to steal a Grimy Key ! So be aware !
- Fireballs: Random Fireballs will come from the skies ! Which can hit up to 50 DAMAGE ! So make sure you keep your health Above that at any cost when running around (also inside).
- Standing Still: When standing still, you'd get hit 1's by the server, so keep running.
- Game takes too long: Everybody gets hit 1's consistently.
Tips and Tricks[edit | edit source]
- Once the Battlegrounds starts, Nobody can attack each other for a decent amount of time. Be smart and use both of your keys to get the best gear possible !
- When opening the 2nd chest make sure to use your overload and get your hp up by eating karambwans first, as they can't be used to combo-heal you.
- When you have drunk an Overload potion, you can drink saradomin brews without decreasing your stats, and they wont stall your account so you can keep fighting, unlike with sharks.
- If you have your spellbook on lunars, you have a chance to get vengeance runes (death, earth, astral) from chests, although the Vengeance isn't as powerful as in OSRS. Keep this in mind.
Gear Guide[edit | edit source]
| Battlegrounds Gear | |||||||||
|---|---|---|---|---|---|---|---|---|---|
| Melee | Mage | Range | |||||||
| Rune Full set (Chain & Platebody) | Mystic Set | Spined Set | |||||||
| Granite Set | Enchanted Set | Black Dragonhide Set | |||||||
| Dragon Full Set (Chain & Platebody) | Skeletal Set | Karil's Set | |||||||
| Verac Set | Infinity Set | Armadyl Set | |||||||
| Guthans Set | Lunar Set | Morrigan's Set | |||||||
| Dharok Set | Ahrim's Set | Pernix Set | |||||||
| Torag's Set | Zurial's Set | / | |||||||
| Bandos Set | Virtus Set | / | |||||||
| Statius's Set (For Defence) Vesta's Set (For Accuracy) |
/ | / | |||||||
| Torva Set | / | / | |||||||
| Magic | |||||||||
|---|---|---|---|---|---|---|---|---|---|
| Helm | Body | Legs | |||||||
| Healer Hat Mystic Hat |
Mystic Body | Mystic Skirt | |||||||
| Enchanted Hat | Enchanted Body | Enchanted Skirt | |||||||
| Skeletal Hat | Skeletal Body | Skeletal Skirt | |||||||
| Infinity Hat | Infinity Body | Infinity Skirt | |||||||
| Lunar Hat | Lunar Body | Lunar Skirt | |||||||
| Ahrim's Hat | Ahrim's Body | Ahrim's Skirt | |||||||
| Zurial's Hat | Zurial's Body | Zurial's Skirt | |||||||
| Virtus Hat | Virtus Body | Virtus Skirt | |||||||
| Ranged Gear detailed | |||||||||
|---|---|---|---|---|---|---|---|---|---|
| Helm | Body | Legs | |||||||
| / | / | Penance Skirt | |||||||
| Spined Hat | Spined Body | Spined Skirt | |||||||
| Robin Hood Hat | / | / | |||||||
| Black Dragonhide Body | Black Dragonhide Chaps | ||||||||
| Karil's Coif | Karil's Body | Karil's Skirt | |||||||
| Archer Helm | / | / | |||||||
| Armadyl Helm | Armadyl's Body | Armadyl's Chaps | |||||||
| / | Morrigan's Body | Morrigan's Chaps | |||||||
| Pernix Coif | Pernix Body | Pernix Chaps | |||||||
| Melee | |||||||||
|---|---|---|---|---|---|---|---|---|---|
| Mainhand | |||||||||
| Granite Maul (SA) | |||||||||
| Dragon Mace (SA) | |||||||||
| Dragon Halberd (SA) | |||||||||
| Dragon Dagger | |||||||||
| Obsidian Maul | |||||||||
| Guthan's Spear | |||||||||
| Verac's Flail | |||||||||
| Barrelchest Anchor (SA) | |||||||||
| Dragon Battleaxe | |||||||||
| Dragon Scimitar | |||||||||
| Zamorakian Spear | |||||||||
| Abyssal Whip | |||||||||
| Zammorak / Saradomin / Bandos / Armadyl Godsword (Same stats, Unique special Attack) (SA) | |||||||||
| Vesta's Spear Vesta's Longsword | |||||||||
| Statius Warhammer (SA) | |||||||||
| Chaotic Warhammer | |||||||||
| Chaotic Rapier | |||||||||
| Chaotic Longsword | |||||||||
| Magic | |||||||||
|---|---|---|---|---|---|---|---|---|---|
| Mainhand | |||||||||
| Saradomin Staff | |||||||||
| Guthix Staff | |||||||||
| Zamorak Staff | |||||||||
| Ahrim's Staff | |||||||||
| Ancient Staff | |||||||||
| Staff of Light | |||||||||
| Master Wand | |||||||||
| Chaotic Staff | |||||||||
| Ranged | |||||||||
|---|---|---|---|---|---|---|---|---|---|
| Mainhand | Shield | ||||||||
| Dragon Dart | |||||||||
| Crystal Bow | |||||||||
| Karil's Crossbow | |||||||||
| Magic Shortbow (SA) | |||||||||
| Morrigans Throwing Axe | |||||||||
| Morrigans Javeline (SA) | |||||||||
| Dark Bow (SA) | |||||||||
| Rune Crossbow | |||||||||
| Armadyl Crossbow | |||||||||
| Chaotic Crossbow | |||||||||
| Gloves | Boots | ||||||
| Void Knight Gloves (Works with Void Set) |

|
|
|
Rock Climbing Boots |
|

|
|
| Combat Bracelet |
|
|
|
Rune Boots |
|
|
|
| Regen Bracelet |
|
|
|
Bandos Boots (Def) (Dragon Boots (Off) |
|
|
|
| Rune Gloves |
|
|
|
Steadfast Boots |
|
|
|
| Black Vambraces |
|
|
|
Infinity Boots |
|
|
|
| Black Spiked Vambraces |
|
|
|
Ragefire Boots |
|
|
|
| Mystic Gloves |
|
|
|
Runner Boots |
|
|
|
| Infinity Gloves |
|
|
|
Ranger Boots |
|
|
|
| Barrows Gloves |
|
|
|
Glaiven Boots |
|
|
|
| Capes | Amulets | ||||||
| Ava's Accumulator |
|
|
|
Berserker's Necklace |
|
|
|
| Ardougne Cape |
|
|
|
Arcane Pulse Necklace Arcane Blast Necklace |
|
|
|
| Obsidian Cape |
|
|
|
Amulet of Power |
|
|
|
| Tokkhar Cape |
|
|
|
Amulet of Magic |
|
|
|
| Fire Cape |
|
|
|
Amulet of Accuracy |
|
|
|
| Zamorak Cape |
|
|
|
Amulet of Strength |
|
|
|
| Saradomin Cape |
|
|
|
Amulet of Glory |
|
|
|
| / | / | / | / | Amulet of Ranging |
|
|
|
| / | / | / | / | Fury Amulet |
|
|
|
| Shields / Offhands | ||||
| Zamorak Book |
|
|
|
|
| Rune Berserker Shield Dragon Square Shield Obby Shield Dragon Kiteshield Rune Defender Dragon Defender Dragon Fireshield |
|
|
|
|
| Saradomin Book Book of Balance Mages Book Tome of Frost Farseer Shield |
|
|
|
|
| Crystal Shield Eagle Eye Kite |
|
|
|
|
| Crystal Shield Spirit Shield Spectral - Arcane - Elysian Spirit Shield |
|
|
|
|
The Finale[edit | edit source]

When there are only 4 players left, everybody will have 15 seconds before they will be teleported for the finals.
When teleported to the final (if you have room in inventory) you get a key for free.
At the finals you can only use 1 key, so there's no reason to hold on to multiple keys
- Use this key wisely, if you're full on food wait till you have enough room to loot the food from the chest.
Rewards[edit | edit source]
| Rewards | |||||||||||||||||||||||||||||||||||||||||||
|---|---|---|---|---|---|---|---|---|---|---|---|---|---|---|---|---|---|---|---|---|---|---|---|---|---|---|---|---|---|---|---|---|---|---|---|---|---|---|---|---|---|---|---|

|